
The Zero-Cost Bottle Garden: Step-by-Step Blueprints for Turning Empty 2-Litre Cold Drink Bottles into Self-Watering Herb Planters
Every home has a few empty 2-litre cold drink bottles that end up in the recycling pile. With a pair of scissors, a piece of old cloth, and a little soil, those same bottles can become self-watering herb planters that keep mint, coriander, and basil moist for days, even when you are busy or away.
This is gardening on a zero budget, and it is also a good project to do with children. In this guide, we'll explain how a bottle planter waters itself, which herbs suit it, and give you three step-by-step designs: a wick planter, an upside-down drip bottle, and a hanging herb bottle for small balconies.
Why Build a Bottle Garden?
Herbs are some of the easiest plants to grow at home, but they are also the first to suffer when watering is irregular. A self-watering planter keeps a small reserve of water below the soil, so the plant takes up moisture as it needs it instead of swinging between dry and soggy.
A bottle planter also reuses plastic that would otherwise be thrown away, costs almost nothing, and fits on a windowsill, a balcony shelf, or a railing stand. It is a simple way to start a kitchen garden without buying any pots.
Benefits of Self-Watering Bottle Planters
- Costs almost nothing, since you reuse bottles and household scraps.
- Keeps soil evenly moist, which herbs like.
- Helps plants cope with busy days and short trips.
- Reduces plastic waste in a small but useful way.
- Fits small spaces such as windowsills and balcony shelves.
- Makes a fun, easy project for children and beginners.
How Does a Bottle Planter Water Itself?
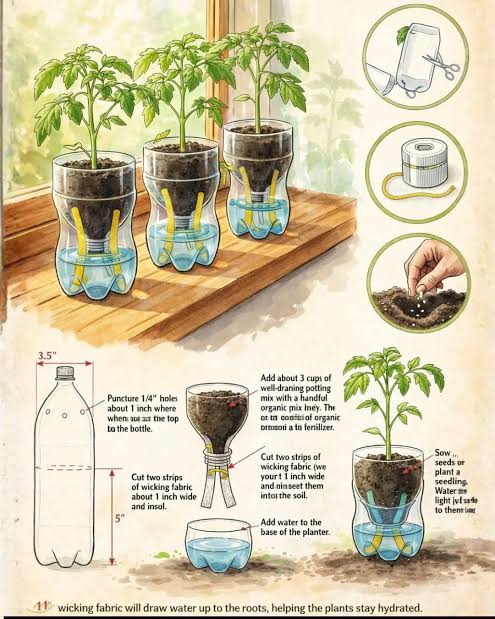
The idea is very simple. The bottle is cut in two. The top half sits upside down inside the bottom half, like a funnel. The bottom half holds water, and the top half holds soil. A strip of cloth, called a wick, runs from the soil down into the water.
Water slowly climbs up the wick through a process called capillary action, in the same way a paper towel soaks up a spill. The soil takes up water from the wick as it dries, so the plant is always supplied with just a little moisture.
"Automated" Does Not Mean Electronic
- These planters water themselves passively, with no pump, battery, or timer.
- They still need you to refill the water reservoir.
- In hot weather, a small bottle may run dry in a few days.
- They are great for helping, but they do not replace regular checks.
What You Need to Get Started
| Item | Purpose | Free Alternative |
|---|---|---|
| Clean 2-litre bottle with cap | Forms the planter and the water reservoir. | Collect from your own recycling. |
| Sharp scissors or a craft knife | Cuts the bottle. | Use kitchen scissors, with care. |
| Cotton cloth strip or cotton rope | Acts as the wick. | Strip from an old cotton T-shirt or dupatta. |
| Potting mix | Holds roots and moisture. | Mix garden soil with kitchen compost and dry leaves. |
| Herb seeds or cuttings | The plants you will grow. | Kitchen coriander seeds, or mint and tulsi cuttings. |
| Dark paper, cloth, or paint | Blocks light from the water to reduce algae. | Old newspaper or a brown paper bag. |
Safety First: Cutting and Making Holes
Plastic bottles are easy to cut, but the edges can be sharp and tools can slip. Take a few minutes to work safely, especially if children are helping.
Safe Bottle Crafting Tips
- Let an adult do all the cutting and hole-making.
- Cut away from your body, on a stable surface.
- Make a small starter hole with a pointed tool, then widen it with scissors.
- If you heat a nail to make holes, hold it with pliers, work in an open, ventilated area, and never touch the hot metal.
- Smooth sharp cut edges with sandpaper or cover them with tape.
- Wash your hands after handling soil and plants.
Design 1: The Wick Self-Watering Planter
This is the classic design and the best one for beginners. It holds water in the base and waters the soil above through a wick. It takes about 20 to 30 minutes to make.
- Remove the label and wash the bottle and cap well with soap and water.
- Cut the bottle in two, just below the point where it stops narrowing and becomes straight. The top part with the neck will be the soil holder, and the bottom part will be the water reservoir.
- Make a hole in the centre of the cap, about 5 to 6 mm wide, and screw the cap back onto the top part.
- Cut a strip of cotton cloth or cotton rope, about 20 to 25 cm long. Thread it through the hole in the cap, leaving about 10 cm hanging below and the rest above.
- Tie a knot in the upper end of the wick so it stays inside the soil and does not slip through the hole.
- Turn the top part upside down and rest it inside the bottom part, so the cap and wick hang in the empty space above the base.
- Fill the bottom part with water so the wick tip touches the water, then lift the top part out again for filling.
- Fill the top part with light potting mix around the wick, pressing it down gently.
- Sow seeds or plant a cutting, then water the top lightly from above to start the wick working.
- Place the top part back into the base, and wrap the lower part with dark paper or cloth.
Design 2: The Upside-Down Drip Bottle
This is the quickest design, and it is useful when you are going away for a few days. A water-filled bottle is pushed upside down into a pot, and it slowly releases water into the soil. It can be used with any pot or planter, including a bottle planter.
- Wash a clean bottle and its cap.
- Make two or three very small holes in the cap with a thin needle or pin.
- Fill the bottle with water and screw the cap on tightly.
- Make a hole in the pot's soil with your finger, or a stick, about as deep as the bottle neck.
- Turn the bottle upside down and push the neck firmly into the soil.
- Check after a few hours, adjusting the number or size of holes if it drips too fast or too slowly.
Drip Bottle Tips
- Start with fewer holes, since you can add more later.
- Test it for a day or two while you are at home before travelling.
- Keep the pot in partial shade, so the bottle does not overheat in the sun.
- Different soils drain at different speeds, so watch how fast your bottle empties.
Design 3: The Hanging Herb Bottle
If floor space is tight, a bottle can be hung as a small herb planter. The lower half of a bottle, with the wick design on top, can be suspended with strong cord.
- Make Design 1, but use a shorter water reservoir so the finished planter stays light.
- Make three small holes near the rim of the upper part, evenly spaced.
- Thread strong cord, such as nylon cord, through each hole and knot it firmly.
- Join the three cords at the top with a knot or a ring.
- Hang from a strong hook on the inside of the balcony, such as an overhead beam, not on the outer railing.
- Check the knots and the hook regularly.
Always check that the hanging spot is strong, and avoid hanging anything above a place where people walk or sit. Wet soil is heavier than it looks, so keep hanging bottles small and light.
Best Herbs for Self-Watering Bottle Planters
Wick planters keep soil evenly moist, so choose herbs that enjoy steady moisture. Herbs that prefer dry soil can rot if their roots stay damp.
| Herb | Suits Wick Planters? | Notes |
|---|---|---|
| Mint (pudina) | Excellent | Loves moist soil and grows fast in a bottle. |
| Coriander (dhania) | Very good | Needs steady moisture and partial sun. |
| Basil | Very good | Needs several hours of sun and regular pinching. |
| Tulsi | Good | Likes sun, so keep the water level moderate. |
| Methi (fenugreek) | Good | Quick leafy crop for cooler months. |
| Spring onion | Good | Works well in the shallow top part. |
| Rosemary, thyme, oregano | Not ideal | Prefer drier soil, and can rot in constantly damp mix. |
The Right Soil Mix for a Bottle Planter
A light, loose mix lets the wick pass moisture upward and keeps roots healthy. Heavy, compacted soil blocks the wick and holds too much water.
A Simple Mix
- Cocopeat or fine garden soil, as the base.
- Kitchen compost or vermicompost, for nutrients.
- A little perlite, coarse sand, or crushed dry leaves for airflow.
- Keep the mix loose, and do not press it down too hard.
Where to Place Your Bottle Planters
A good spot makes a big difference, and bottles need a little extra thought because plastic heats up in the sun.
- Give herbs about 4 to 6 hours of light, with some shade during the harshest afternoon sun.
- Wrap the water reservoir in dark paper or cloth so light does not reach the water, which helps prevent algae.
- Do not leave bottles in hot, direct sun for long, because the water and roots can overheat.
- Place planters on a tray or a stable shelf, so a gust of wind cannot knock them over.
- On balconies, keep planters on the inside, and never balance them on the outer railing.
Bottle Garden Care Through the Seasons
| Season | Main Challenge | What to Do |
|---|---|---|
| Summer | Heat and fast water loss | Place in afternoon shade, wrap the bottle, and check the water every day or two. |
| Monsoon | Too much rain and mosquitoes | Keep planters under shelter, and keep the reservoir covered. |
| Winter | Slow growth and slow water use | Keep in the sunniest spot, and refill less often. |
| Spring | Fresh growth | Refresh the soil, trim herbs, and sow new seeds. |
Keeping Mosquitoes and Algae Away
Stored water can attract mosquitoes and grow algae, so it is worth taking a few small steps to keep the planter clean.
- Keep the reservoir closed, with only a small opening for the wick and for refilling.
- Use a mesh or a piece of cloth over any open refill hole.
- Do not let water stand for weeks. Empty and rinse the reservoir every 1 to 2 weeks.
- Block light from the water with dark wrapping.
- Check for tiny larvae in the water, and empty the reservoir if you see any.
Common Problems and Fixes
| Problem | Possible Cause | First Step |
|---|---|---|
| Soil stays dry | Wick is not touching the water or is too thin | Check that the wick tip reaches the water, or use a thicker wick. |
| Soil is soggy | Wick too thick, or too much rain | Use a thinner wick and keep the planter sheltered. |
| Green slime in the water | Light is reaching the water | Wrap the reservoir and clean it out. |
| Yellow leaves | Too much water or poor drainage in the mix | Use a looser mix and lower the water level. |
| Herb is weak and leggy | Not enough sunlight | Move it to a brighter spot. |
| Bottle falls over | Top-heavy or windy spot | Place it on a tray, in a stand, or in a sheltered corner. |
Common Mistakes to Avoid
| Common Mistake | Better Practice |
|---|---|
| Using a bottle that is not clean | Wash it well with soap and water first. |
| Using a nylon or plastic string as a wick | Use cotton cloth or cotton rope, which absorbs water well. |
| Using heavy, compact soil | Use a light, loose mix with compost and perlite or sand. |
| Leaving the clear bottle in strong sun | Shade the bottle and wrap the water reservoir. |
| Growing dry-loving herbs in a wick planter | Choose herbs like mint, coriander, and basil. |
| Forgetting to refill the reservoir | Check the water level on a fixed day each week. |
| Hanging a heavy planter from the outer railing | Hang only light planters from strong inside hooks. |
Creative Ideas for Your Bottle Garden
Once you have made one planter, it is easy to make a whole mini garden. Here are a few ways to make your bottle planters more attractive and useful.
- Paint or wrap the outside of each bottle in bright colours, using non-toxic paint.
- Label each planter with the herb's name, using waterproof markers.
- Group several planters together on a wooden crate or a shelf to create a mini herb station.
- Make a vertical herb tower by stacking planters on a stand.
- Let children decorate their own bottle and look after their own herb.
- Gift a bottle planter with a small herb to a friend.
Frequently Asked Questions
How long will a 2-litre bottle planter water itself?
It depends on the weather, the herb, and the size of the reservoir. As a rough guide, a small reservoir may last several days in hot weather and longer in cooler months. Check the water level regularly and adjust.
What can I use as a wick?
Cotton cloth or cotton rope works well. Avoid nylon, polyester, or plastic strings, because they do not absorb and carry water well.
Are plastic bottles safe for growing herbs?
Clean food-grade drink bottles are widely reused for planters. Do not use bottles that held chemicals, and replace any bottle that becomes brittle, cracked, or badly faded from sun.
Which herbs grow best in a bottle planter?
Mint, coriander, basil, tulsi, methi, and spring onions grow well. Herbs that prefer dry soil, such as rosemary, thyme, and oregano, are not good choices for wick planters.
Will the water attract mosquitoes?
It can if water is left open and unused for weeks. Keep the reservoir covered, empty and rinse it every 1 to 2 weeks, and check for larvae.
Can I leave the planter for a week while I travel?
Test it for several days at home first. For short trips it can work well in cooler weather, but in peak summer it may run dry. If you can, ask a neighbour to check on it.
Do I need drainage holes in a bottle planter?
In the wick design, the water reservoir below is separate from the soil, so excess water cannot gather in the soil. For other designs, such as a bottle used as a normal pot, always add drainage holes.
Is this a good project for children?
Yes, as long as an adult does the cutting and hole-making. Children can decorate the bottle, fill it with soil, plant seeds, and watch the herb grow.
Bottle Garden Maintenance Checklist
| Care Activity | Recommended Frequency | Purpose |
|---|---|---|
| Check the water level | Every 2–3 days | Make sure the reservoir never runs dry. |
| Empty and rinse the reservoir | Every 1–2 weeks | Prevent algae and mosquitoes. |
| Check the wick | Weekly | Make sure water is still rising into the soil. |
| Harvest and pinch herbs | Weekly | Encourage bushy, healthy growth. |
| Feed lightly with compost | Every 4–6 weeks | Replace used-up nutrients. |
| Check bottle and hooks | Monthly | Replace cracked bottles and check hanging safety. |
Signs Your Bottle Garden Is Working
- The soil feels evenly damp, but not soggy.
- The water level in the reservoir goes down slowly.
- Herbs produce new, bright green leaves.
- Plants stay fresh even on busy days.
- The water stays clear, with no green slime or larvae.
- You can harvest herbs regularly for cooking.
Grow Your Herb Garden with BloomingDen
At BloomingDen, we make gardening simple and enjoyable, whether you're starting with a bottle on a windowsill or planning a full balcony garden. We offer plants, gardening supplies, and expert guidance to help you succeed.
Explore the Bloom Store for healthy herb plants and potting supplies, and book a verified gardener if you'd like help setting up and caring for your garden.
Conclusion
A bottle garden proves that you do not need much money to grow fresh herbs at home. With a clean 2-litre bottle, a cotton wick, and some soil, you can build a planter that keeps moisture steady and gives you mint, coriander, and basil for your kitchen.
Remember that these planters are passive helpers, not machines. Choose herbs that like moisture, protect the water from light, keep the reservoir clean, and refill it regularly.
Start with one bottle, learn how it behaves in your home, and then build more. Before long, your recycling pile can become a small, green herb garden.